The Transfer Dialog
After initiating a transfer from a selection of one or more items, a transfer dialog will appear. Here, you can specify the details of the transfer. The dialog looks slightly different depending on what kind of item you are transferring, and how you initiated the transfer.
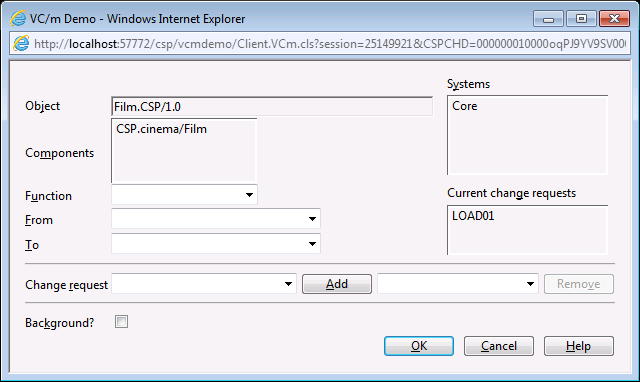
Object Version Transfer Dialog

- Object
- The name of the object being transferred. This field is read-only.
- Components
- A list of components that belong to the object. This field is also read-only.
- Function
- The function of the transfer. Each transfer route is assigned a named function. Its first purpose is to describe the nature of the transfer, for example, a transfer route between a test location and a failures location is likely to have a transfer function called 'Fail Testing'. Its second purpose is to differentiate between multiple transfer routes that exist between the same from location and to location. This field will be populated if you initiated the transfer by choosing a transfer type from the menu bar or the right-click menu.
- From
- The from location of the transfer. This may already be populated with the location at which the object version exists. If not, choose it from the drop-down box.
- To
- The to location of the transfer. If you instigated the transfer using the drag-drop method, this should already be populated with the location that you dropped the object version onto. Otherwise, choose it from the drop-down box.
- Systems
- A list of the systems that the object version belongs to.
- Current Change Requests
- A list of change requests that the object version already belongs to.
- Change Request
- All transfers must be done in reference to a change request. You can either specify a change request that already exists by choosing it from the drop-down combo box and clicking the Add button, or you can create a new one by choosing a change request type from the bottom of the drop-down combo-box list and clicking the Add button.
- Background?
- For specifying whether or not you want the transfer to process in the background. This is useful for transferring a large quantity of items. If selected, Deltanji will not output the new audit trail entries in the audit trail panel, although the entries can still be accessed by refreshing the audit trail panel or by navigating to the Audit Trail folder in the folders panel.
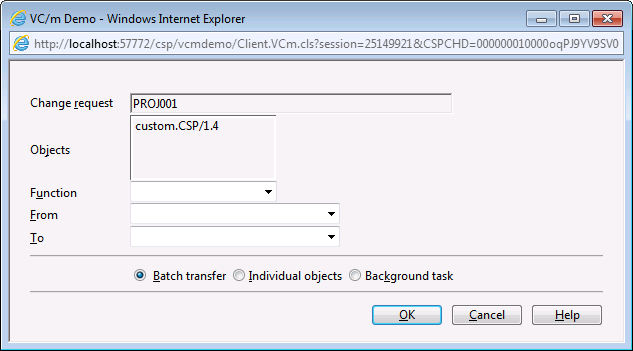
Change Request Transfer Dialog

- Change Request
- The name of the change request whose object versions are being transferred. This field is read-only.
- Objects
- A list of object versions that belong to the object. This field is also read-only.
- Function
- The function of the transfer. Each transfer route is assigned a named function. Its first purpose is to describe the nature of the transfer, for example, a transfer route between a test location and a failures location is likely to have a transfer function called 'Fail Testing'. Its second purpose is to differentiate between multiple transfer routes that exist between the same from location and to location. This field will be populated if you initiated the transfer by choosing a transfer type from the menu bar or the right-click menu.
- From
- The from location of the transfer. This may already be populated with the location at which the object version exists. If not, choose it from the drop-down box.
- To
- The to location of the transfer. If you instigated the transfer using the drag-drop method, this should already be populated with the location that you dropped the change request onto. Otherwise, choose it from the drop-down box.
- Processing type
-
- Batch transfer - transfers all the objects, reporting in the audit trail panel after each one. Continues after any error which may be encountered. This is the default.
- Individual objects - transfers all the objects, reporting in the audit trail panel after each one. Stops and consults the user interactively if an error occurs.
- Background task - transfers will only be displayed if the audit trail panel is refreshed. Continues after any error which may be encountered.
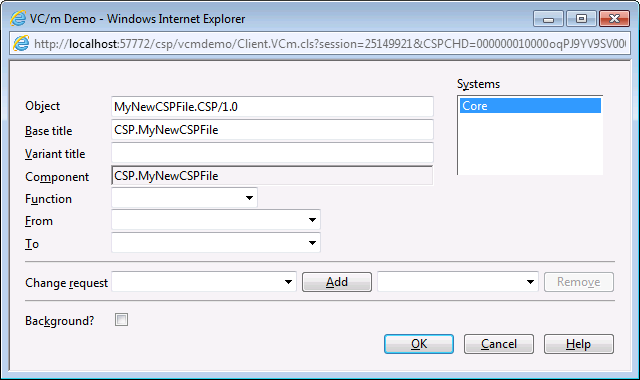
Component Transfer Dialog

- Object
- The name of the object being transferred (or in this case, created). This field can be edited, although it is populated with an automatically generated object name. If you wish to edit the object name, make sure you understand the naming standards in Deltanji by reading the articles about object versions and valid names.
- Base title
- A short description of the base object. A base object is one that is not a variant of another object. This field is automatically populated. It appears in the Description column when you are viewing objects in the main panel.
- Variant title
- A short description of the variant object. This should only be entered if the object that is being created is a variant of another object that is already registered to Deltanji. If this is set, it overrides the base title and is displayed in the Description column when you are viewing objects in the main panel.
- Component
- The name of the component being registered.
- Function
- The function of the transfer. Each transfer route is assigned a named function. Its
first purpose is to describe the nature of the transfer, for example, a transfer route
between a test location and a failures location is likely to have a transfer function
called 'Fail Testing'. Its second purpose is to differentiate between multiple transfer
routes that exist between the same from location and to location. This field will be populated if you initiated the transfer by choosing a transfer
type from the menu bar or the right-click menu.
Note: For component transfers, only the Register function will be valid. - From
- The from location of the transfer. This should already be populated with the location at which the component exists. If not, choose it from the drop-down box. This field should match the 'To' field.
- To
- The to location of the transfer. This should already be populated with the location at which the component exists. If not, choose it from the drop-down box. This field should match the 'From' field.
- Change Request
- All transfers must be done in reference to a change request. You can either specify a change request that already exists by choosing it from the drop-down combo box and clicking the Add button, or you can create a new one by choosing a change request type from the bottom of the drop-down combo-box list and clicking the Add button.
- Background?
- For specifying whether or not you want the transfer to process in the background. This is useful for transferring a large quantity of items. If selected, Deltanji will not output the new audit trail entries in the audit trail panel, although the entries can still be accessed by refreshing the audit trail panel or by navigating to the Audit Trail folder in the folders panel.
See Also: Transfers, Bulk Transfers, Transfer Routes, Object Versions, Components, Change Requests, Audit Trail Panel