Managing Transfer Routes
Transfer routes define the locations that object versions can be moved or copied between. They also specify exactly what happens to the object at both the from location and the to location.
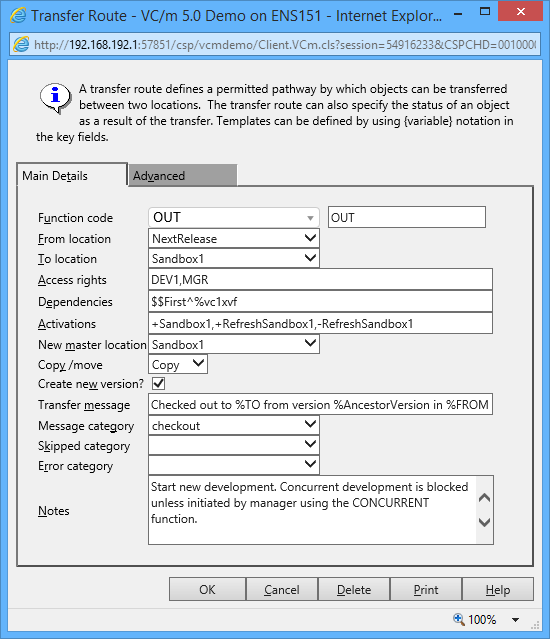
For more information, see the article on transfer routes.
You can manage transfer routes by navigating in the folders panel to Setup -> Transfer Routes. If any transfer routes are already set up, these should be listed in the main panel.
Adding and Modifying Transfer Routes

1. Double-click on the transfer route you want to edit, or choose File -> New from the menu bar to create a new transfer route.
2. Fill in the fields on the dialog.

These fields are found in the Main Details Tab:
- Function Code
- Specifies which function code this transfer route will take. This is a drop-down combo
box which means that a user can define their own function code. This needs to conform
to the valid naming conventions.
Note: When defining your own transfer route a caption must be set. This field can be found under the Advanced tab. If a caption is not set, the function code will not appear in the drop-down list in the transfer dialog.
Note: When defining your own function code, there are certain codes that cannot be used because they are reserved. See the list of reserved transfer route function codes.
- From location
- The starting point of the transfer route, i.e. the location that the object version should be transferred from.
- To location
- The end point of the transfer route, i.e. the location that the object version should be transferred to.
- Access rights
- Specifies the access rights for this transfer.
- Dependencies
- A list of requirements for the transfer, including locations, location classes and dependency functions. For example, if a location is listed here, an object will not be able to move along the transfer route unless it is active at that location. For more information, see the article on syntaxes.
- Activations
- Specifies locations at which the object will become active when it moves along the transfer route. The to location is usually listed here. For more information, see the article on syntaxes.
- New master location
- The location at which to find the master copy of the object version after the transfer. Not every route specifies a new master. If it does, the transfer will also activate the object at that location if necessary but it is the system manager's responsibility to ensure that the workflow will have physically placed the object's component(s) into the storage associated with the new master location.
- Copy/move
- Specifies whether or not the object should remain at the 'From location'.
- Create new version?
- Specifies whether or not the object version should be incremented as it is transferred.
- Transfer message
- The message that is written to the audit trail when the transfer completes. This can include the symbolic names %FROM and %TO.
- Message category
- The category of message created when the transfer completes.
- Skipped category
- The category of message created when the transfer is skipped.
- Error category
- The category of message created when the transfer returns an error.
- Notes
- More detailed information about the transfer route.
These fields are found in the Advanced Tab:
- Function caption
- The name of the transfer option as it appears in the right-click menu.
- Copy only if changed?
- If selected, the object will only be copied if it differs from the object version that already exists at the 'To location'.
- Status date behaviour
- (Deprecated)
- Status date caption
- (Deprecated)
See Also: Transfer Routes, Transfers